In this blog post, I'll be going over how you can be smart about how your search indexes are organized, as well as how you can avoid downtime while rebuilding your indexes.
If you haven't read my first blog post Tackling the challenges of architecting a search indexing infrastructure in Sitecore - Part 1, I recommend doing so, before digging into the content of this blog post.
How should the search indexes be organized?
In my blog post A re-introduction to the ContentSearch API in Sitecore - Part 1, one of the things I mentioned is that you need to get a handle to the search index you want to work on, before making the queries. What I didn't mention are the default indexes that comes by default together with Sitecore. On that note, let’s take a few steps back and look a bit closer on the default search indexes that comes together with Sitecore.
Out of the box, Sitecore comes with 3 predefined indexes:
sitecore_core_indexsitecore_master_indexsitecore_web_index
Well, that's not the entire story, as Sitecore actually includes around 11 additional indexes, which we'll get back to a few lines further down.
Each of these indexes include all versions of all items in each of the Sitecore databases, meaning that the sitecore_core_index includes all indexed items for the core database, and so on. In practice, Sitecore uses these indexes for item buckets, media items, and like.
The 'God Index' problem
When we as developers create custom item templates, items created from these templates will eventually end up being indexed. By default, the items will be indexed into the standard indexes that are available out of the box, which seems to be good candidates for storing the data. This means that when we want to query the data, we can simply use standard indexes to retrieve the stored data using the ContentSearch API - everything is good, right?
Despite it's immediate simplicity, using the default Sitecore indexes has several disadvantages. Most notably, a direct consequence of this is that the default indexes will end up being a God Object (an anti-pattern), meaning that the indexes knows too much or does too much.

... One index to rule them all. One index to query. One index to bring together all the data and in the darkness store them.
In practice, you'll experience that each search entry you query from the search index will contain too much information and the index will grow large in size, not to mention the potential maintenance collapse lurking around just waiting to leap out of the shadows.
So what can we do in order to make our lives easier?
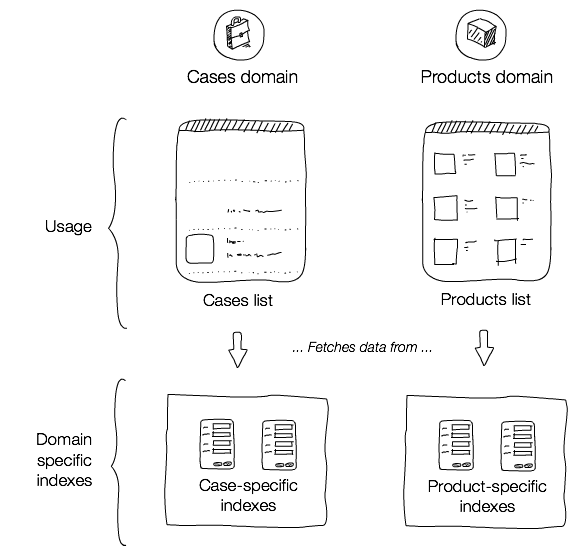
As explained in Indexing Patterns in Sitecore there is an alternative approach, called the domain index pattern that aims to address the disadvantages of using the default Sitecore indexes. Essentially, when using a domain index, instead of storing all our domain specific data into the standard indexes, we organize the indexes based on the business domains and configure a new index for every domain, where the data is stored in the most optimal way for us to query.

I highly recommend using this approach, even though it might initially impose a more complicated setup, where you need to configure the indexes to exclude data "noise". In the long run, you'll appreciate using domain indexes, as they give you much smaller, yet concise and cohesive indexes to work with, thus avoiding all of the disadvantages you get by using the more simpler solution of using the default Sitecore indexes. Oh, and in case I forgot to mention, those other 11 indexes Sitecore comes with, they are actually organized according to the domain index pattern.
Keeping my promise of answering an old question
I'd like to go back to a question I originally asked in my blog post Extending the default ContentSearch functionality in Sitecore, as to how do I decide how many custom implementations I need?
Now that you've seen the domain index pattern, you should apply the same principle as when you create custom SearchResultItem implementations. This means that for each domain specific index you have, you should create a SearchResultItem implementation that matches the data you plan in retrieving for that domain. That way, you'll have both small and strongly cohesive models to be used with retrieving data from the different search indexes.
Avoiding downtime during index rebuilds
With the index organization in place, the next thing we need to be aware of when configuring a Solr setup for production, is how we can avoid downtime during index rebuilding.
The problem occurs when an index rebuild is triggered, since the first thing that happens is that everything that was stored in the index before will now be deleted. Afterwards, the indexing of the Sitecore items will now begin, and the index will begin to build up the document entries to be stored in the given Solr index(es). While the index rebuilding takes place, all of the ContentSearch API query functionalities will be unavailable.

Let's say that an index needs to rebuild while living on a Sitecore solution in production, where large portions of the site use search as it driving technology. While the process of indexing is running, the site will be heavily affected, and for the end-users visiting the site, it will be useless for most parts. To make things even worse, as the client creates more items in the Sitecore databases, the indexing process time will only increase.
Atomically swapping the cores
In order to avoid downtime during index rebuilding, Sitecore utilizes a feature called core swapping in a quite ingenious way.
In a nutshell, core swapping allows replacing a "primary" core with an "secondary" core, while keeping the old "primary" core running in case you decide to roll-back.
Looking at it from the perspective of Sitecore, this means that when the index rebuilding process is triggered, Sitecore will perform the indexing operation on a different, secondary, core. This allows for the current, primary, core to serve the site end-users with search results, while the secondary core is being rebuild. Once the index rebuilding is done, Sitecore will call the swap command to swap the two cores, whereas previous secondary core, will now become the new primary core.
Enabling the core swapping functionality
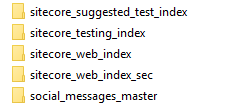
In order to enable the core swapping functionality, we first need to create a copy of the core that we want to apply the core swapping functionality on. Let's say that we want to enable the functionality for the Sitecore's web index, named sitecore_web_index. Depending on how you installed the Solr server, locate the ...\solr-xxx\apache-solr\solr folder - if you use Bitnami, as described in Setting up Solr for Sitecore 8.x, you should be able to find the core for the sitecore_web_index in the C:\Bitnami\solr-xxx\apache-solr\solr folder. Once the folder is located, create a copy of the sitecore_web_index folder, and name it sitecore_web_index_sec. The newly created core will function as the secondary web index core:

Once the secondary core is created, all there is left for us to do, is to make a few adjustments to the Sitecore.ContentSearch.Solr.Index.Web.config configuration file, found under \App_Config\Include. In order to enable the core swapping, the following two things must be done:
- Change the type of the index from
Sitecore.ContentSearch.SolrProvider.SolrSearchIndextoSitecore.ContentSearch.SolrProvider.SwitchOnRebuildSolrSearchIndex - Add the parameter
rebuildcoreand point it to the secondary core for the web index
Once the changes are applied, the final configuration should look similar to the code shown below:
When the index is rebuilding, the search functionalities will all still be available throughout the entire process. And that's it, that's all there is to it - easy, right?
As a final note, if you haven't already enabled this functionality on the solutions you work on, I highly recommend enabling it for production environments, as it requires a very small effort to create a lot of value.